
Saturday, April 21, 2012
Friday, April 20, 2012
What's In My Fridge?
I saw this post on Serious Eats come up on my RSS feed the other day and will admit to being intrigued. There's just something about getting a candid look into a usually-unseen part of somebody's life that is so fascinating, so naturally I couldn't resist. I think it's human nature to be curious, right?
I thought it would be fun to share a peek into my own fridge and freezer. When I opened up my fridge, there were quite a few things I wanted to toss (or at least hide) but I didn't, otherwise this wouldn't be an honest look!


In the fridge: THREE different nut butters (Trader Joe's Valencia Peanut Butter, Artisana Raw Pecan Butter and Trader Joe's Almond Butter), 2% Plain Fage Greek Yogurt and 2% Cottage Cheese, leftover Peanut Butter Cup Truffle dessert from Bern's Steakhouse (has since been eaten!) and Cannoli Filling my mom and dad shipped to us from Mike's Pastry in Boston!
You'll also notice we keep a TON of veggies on hand in the fridge because I eat salads every day for lunch, then another salad along with dinner and always a cooked vegetable at dinner time too. One trick to eating lots of vegetables is BUYING lots of vegetables! Then, prepare a bunch of them for easy grabbing for snacks: wash and cut up, then store in plastic containers. You will be much more likely to grab a veggie for a snack if you have them already prepared!
The bag of BBQ Rib Bones is for Hudson to chew on as an occasional treat :-)
In the door you'll find the usual: open condiments, soda (Bad, Bad Jules - but truthfully, it was purchased for Rum & Cokes so it's all good!), decaf coffees that we hardly ever use (hence why they're chillin' in the fridge)...oh and LOTS of BOOZE - par-tay at my house!


The Freezer is full of frozen fish (we stock up on frozen sustainable and wild-caught fish at Trader Joe's and Whole Foods, when on sale), Trader Joe's goodies, a random frozen pizza that was free and waffles. Love us some WAFFLES for breakfast! (The Kashi and Van's brands frozen waffles are low in sugar, high in fiber and protein and are made with 100% whole grains :-)
We also have lots of frozen fruit for smoothies or for adding into plain yogurt or cottage cheese. And yet more booze. Clearly somebody in this house must have a drinking problem...but hey, at least it's good booze, right?!
So, that's the fridge and freezer at our house. Perhaps a little "boring" by some standards, but a fairly typical representation of what you'd find if you came over any old day of the week and took a peek inside our fridge. We probably wouldn't be the most popular choice for house-sitting but hey, I think our healthy choices (cannoli filling and liquor aside) are serving us pretty well!
What's in YOUR fridge? Care to share?

I thought it would be fun to share a peek into my own fridge and freezer. When I opened up my fridge, there were quite a few things I wanted to toss (or at least hide) but I didn't, otherwise this wouldn't be an honest look!


In the fridge: THREE different nut butters (Trader Joe's Valencia Peanut Butter, Artisana Raw Pecan Butter and Trader Joe's Almond Butter), 2% Plain Fage Greek Yogurt and 2% Cottage Cheese, leftover Peanut Butter Cup Truffle dessert from Bern's Steakhouse (has since been eaten!) and Cannoli Filling my mom and dad shipped to us from Mike's Pastry in Boston!
You'll also notice we keep a TON of veggies on hand in the fridge because I eat salads every day for lunch, then another salad along with dinner and always a cooked vegetable at dinner time too. One trick to eating lots of vegetables is BUYING lots of vegetables! Then, prepare a bunch of them for easy grabbing for snacks: wash and cut up, then store in plastic containers. You will be much more likely to grab a veggie for a snack if you have them already prepared!
The bag of BBQ Rib Bones is for Hudson to chew on as an occasional treat :-)
In the door you'll find the usual: open condiments, soda (Bad, Bad Jules - but truthfully, it was purchased for Rum & Cokes so it's all good!), decaf coffees that we hardly ever use (hence why they're chillin' in the fridge)...oh and LOTS of BOOZE - par-tay at my house!


We also have lots of frozen fruit for smoothies or for adding into plain yogurt or cottage cheese. And yet more booze. Clearly somebody in this house must have a drinking problem...but hey, at least it's good booze, right?!
So, that's the fridge and freezer at our house. Perhaps a little "boring" by some standards, but a fairly typical representation of what you'd find if you came over any old day of the week and took a peek inside our fridge. We probably wouldn't be the most popular choice for house-sitting but hey, I think our healthy choices (cannoli filling and liquor aside) are serving us pretty well!
What's in YOUR fridge? Care to share?

What's In My Fridge?
I saw this post on Serious Eats come up on my RSS feed the other day and will admit to being intrigued. There's just something about getting a candid look into a usually-unseen part of somebody's life that is so fascinating, so naturally I couldn't resist. I think it's human nature to be curious, right?
I thought it would be fun to share a peek into my own fridge and freezer. When I opened up my fridge, there were quite a few things I wanted to toss (or at least hide) but I didn't, otherwise this wouldn't be an honest look!
In the fridge: THREE different nut butters (Trader Joe's Valencia Peanut Butter, Artisana Raw Pecan Butter and Trader Joe's Almond Butter), 2% Plain Fage Greek Yogurt and 2% Cottage Cheese, leftover Peanut Butter Cup Truffle dessert from Bern's Steakhouse (has since been eaten!) and Cannoli Filling my mom and dad shipped to us from Mike's Pastry in Boston!
You'll also notice we keep a TON of veggies on hand in the fridge because I eat salads every day for lunch, then another salad along with dinner and always a cooked vegetable at dinner time too. One trick to eating lots of vegetables is BUYING lots of vegetables! Then, prepare a bunch of them for easy grabbing for snacks: wash and cut up, then store in plastic containers. You will be much more likely to grab a veggie for a snack if you have them already prepared!
The bag of BBQ Rib Bones is for Hudson to chew on as an occasional treat :-)
In the door you'll find the usual: open condiments, soda (Bad, Bad Jules - but truthfully, it was purchased for Rum & Cokes so it's all good!), decaf coffees that we hardly ever use (hence why they're chillin' in the fridge)...oh and LOTS of BOOZE - par-tay at my house!
The Freezer is full of frozen fish (we stock up on frozen sustainable and wild-caught fish at Trader Joe's and Whole Foods, when on sale), Trader Joe's goodies, a random frozen pizza that was free and waffles. Love us some WAFFLES for breakfast! (The Kashi and Van's brands frozen waffles are low in sugar, high in fiber and protein and are made with 100% whole grains :-)
We also have lots of frozen fruit for smoothies or for adding into plain yogurt or cottage cheese. And yet more booze. Clearly somebody in this house must have a drinking problem...but hey, at least it's good booze, right?!
So, that's the fridge and freezer at our house. Perhaps a little "boring" by some standards, but a fairly typical representation of what you'd find if you came over any old day of the week and took a peek inside our fridge. We probably wouldn't be the most popular choice for house-sitting but hey, I think our healthy choices (cannoli filling and liquor aside) are serving us pretty well!
What's in YOUR fridge? Care to share?
I thought it would be fun to share a peek into my own fridge and freezer. When I opened up my fridge, there were quite a few things I wanted to toss (or at least hide) but I didn't, otherwise this wouldn't be an honest look!
In the fridge: THREE different nut butters (Trader Joe's Valencia Peanut Butter, Artisana Raw Pecan Butter and Trader Joe's Almond Butter), 2% Plain Fage Greek Yogurt and 2% Cottage Cheese, leftover Peanut Butter Cup Truffle dessert from Bern's Steakhouse (has since been eaten!) and Cannoli Filling my mom and dad shipped to us from Mike's Pastry in Boston!
You'll also notice we keep a TON of veggies on hand in the fridge because I eat salads every day for lunch, then another salad along with dinner and always a cooked vegetable at dinner time too. One trick to eating lots of vegetables is BUYING lots of vegetables! Then, prepare a bunch of them for easy grabbing for snacks: wash and cut up, then store in plastic containers. You will be much more likely to grab a veggie for a snack if you have them already prepared!
The bag of BBQ Rib Bones is for Hudson to chew on as an occasional treat :-)
In the door you'll find the usual: open condiments, soda (Bad, Bad Jules - but truthfully, it was purchased for Rum & Cokes so it's all good!), decaf coffees that we hardly ever use (hence why they're chillin' in the fridge)...oh and LOTS of BOOZE - par-tay at my house!
We also have lots of frozen fruit for smoothies or for adding into plain yogurt or cottage cheese. And yet more booze. Clearly somebody in this house must have a drinking problem...but hey, at least it's good booze, right?!
So, that's the fridge and freezer at our house. Perhaps a little "boring" by some standards, but a fairly typical representation of what you'd find if you came over any old day of the week and took a peek inside our fridge. We probably wouldn't be the most popular choice for house-sitting but hey, I think our healthy choices (cannoli filling and liquor aside) are serving us pretty well!
What's in YOUR fridge? Care to share?
Tuesday, April 17, 2012
Dijon Herb Salmon with Braised Lentils
This dinner was one of our recent favorites and it came together in less than 45 minutes, definitely worth sharing for that fact alone, plus it is super healthy and really delicious. Plus, if you're anything like me, you will probably have all of the ingredients on hand too. Win!

I stocked up on MSC-Certified Wild Alaskan Sockeye Salmon when it was on sale at Whole Foods a few months ago and we've stored the vacuum-sealed filets in the freezer ever since then (they came vacuum-packed). When salmon is on the meal plan, I thaw the whole package in the refrigerator overnight and it's completely thawed by the following evening when it's time to cook dinner. At that point, it just gets a quick rinse and pat dry, and then I go over it with my fingers to make sure there aren't any bones. If there are, they get pulled out with tweezers and it's ready to go. Simple.
I served the salmon on a bed of my favorite Herb Braised Lentils (I've posted the recipe before, see it here). They went together perfectly and the meal was both filling and completely delicious, while still feeling healthy (and it was!). The original recipe says you can grill the fish, or use a grill pan, but I just broiled it since I'm not much of a griller (I leave that to my hubs) and I don't own a grill pan. It turned out fine, although a touch on the well-done side - oops! Mine was an especially thin salmon filet, so just keep an eye on it if you go that route, and plus it was Wild Sockeye, which tends to be leaner and can therefore get a bit dry if over-cooked.

Dijon Herb Salmon
serves 4
adapted from Skinny Taste
4 garlic cloves
1 heaping teaspoon dried Herbs de Provence
1 teaspoon red wine vinegar
2 teaspoons extra virgin olive oil, divided
2 teaspoons Dijon mustard
non-stick cooking spray
1 1/4 lb Wild Alaskan Sockeye Salmon filet (mine was about 3/4'' thick), rinsed and patted dry
kosher salt and black pepper, to taste
lemon wedges and sprigs of fresh thyme, for serving
Preheat broiler to High and set an oven rack 4-6'' from the heat source.
Using a mortar and pestle, mash the garlic cloves with the herbs, vinegar, 1 teaspoon of olive oil and the mustard until it becomes a paste (make sure to break up the garlic cloves very well). Alternatively, you could use a mini food-processor/chopper for this step. Set aside.
Line a baking sheet with a piece of aluminum foil and spray with the non-stick cooking spray. Place the fish on the sheet, skin side down, and brush the flesh with the remaining teaspoon of olive oil. Season with the salt and pepper. Broil the fish 4-5 minutes, spreading the Dijon-Herb sauce onto the fish for the last minute of cooking time - the actual amount of cooking time will vary depending on the thickness of your filet. A thicker salmon filet will require up to 7 or 8 minutes of broiling.
Top the fish with the sprigs of thyme and serve with lemon wedges, on top of a bed of the prepared Herb Braised Lentils.

Dijon Herb Salmon with Braised Lentils
This dinner was one of our recent favorites and it came together in less than 45 minutes, definitely worth sharing for that fact alone, plus it is super healthy and really delicious. Plus, if you're anything like me, you will probably have all of the ingredients on hand too. Win!
I stocked up on MSC-Certified Wild Alaskan Sockeye Salmon when it was on sale at Whole Foods a few months ago and we've stored the vacuum-sealed filets in the freezer ever since then (they came vacuum-packed). When salmon is on the meal plan, I thaw the whole package in the refrigerator overnight and it's completely thawed by the following evening when it's time to cook dinner. At that point, it just gets a quick rinse and pat dry, and then I go over it with my fingers to make sure there aren't any bones. If there are, they get pulled out with tweezers and it's ready to go. Simple.
I served the salmon on a bed of my favorite Herb Braised Lentils (I've posted the recipe before, see it here). They went together perfectly and the meal was both filling and completely delicious, while still feeling healthy (and it was!). The original recipe says you can grill the fish, or use a grill pan, but I just broiled it since I'm not much of a griller (I leave that to my hubs) and I don't own a grill pan. It turned out fine, although a touch on the well-done side - oops! Mine was an especially thin salmon filet, so just keep an eye on it if you go that route, and plus it was Wild Sockeye, which tends to be leaner and can therefore get a bit dry if over-cooked.
Dijon Herb Salmon
serves 4
adapted from Skinny Taste
4 garlic cloves
1 heaping teaspoon dried Herbs de Provence
1 teaspoon red wine vinegar
2 teaspoons extra virgin olive oil, divided
2 teaspoons Dijon mustard
non-stick cooking spray
1 1/4 lb Wild Alaskan Sockeye Salmon filet (mine was about 3/4'' thick), rinsed and patted dry
kosher salt and black pepper, to taste
lemon wedges and sprigs of fresh thyme, for serving
Preheat broiler to High and set an oven rack 4-6'' from the heat source.
Using a mortar and pestle, mash the garlic cloves with the herbs, vinegar, 1 teaspoon of olive oil and the mustard until it becomes a paste (make sure to break up the garlic cloves very well). Alternatively, you could use a mini food-processor/chopper for this step. Set aside.
Line a baking sheet with a piece of aluminum foil and spray with the non-stick cooking spray. Place the fish on the sheet, skin side down, and brush the flesh with the remaining teaspoon of olive oil. Season with the salt and pepper. Broil the fish 4-5 minutes, spreading the Dijon-Herb sauce onto the fish for the last minute of cooking time - the actual amount of cooking time will vary depending on the thickness of your filet. A thicker salmon filet will require up to 7 or 8 minutes of broiling.
Top the fish with the sprigs of thyme and serve with lemon wedges, on top of a bed of the prepared Herb Braised Lentils.
Blogosphere Roundup
I was catching up on posts from some of my favorite blogs and came across a few really good ones. Make sure to click the links to go to the full posts!
From A Cup of Jo...
Her illustrated guide to all things Table Manners and Etiquette at the Dinner Table
Some really helpful hints and tips. I never knew the "cat in your lap, mouse behind you" tip!

 |
| Image via A Cup of Joe |
And along similar lines... Wine Etiquette, also from A Cup of Jo.
Joy the Baker always posts the most lovely, delicious things. Honestly, I am drooling over her Lunch Waffles with Apples and Prosciutto
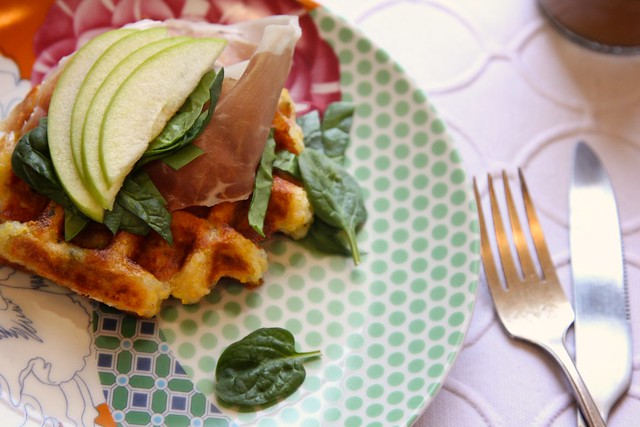 |
| Image via Joy the Baker |
(By the way, are you listening to the Joy the Baker Podcasts? If not, you are seriously missing out. They are such fun! I love listening while I chop veggies for dinner or bust out a half-hour workout on the elliptical.)
Clever and Cute Sunday Brunch idea....
 |
| Image via ValSoCal What blogs do you follow and what is inspiring you these days?! |
Blogosphere Roundup
I was catching up on posts from some of my favorite blogs and came across a few really good ones. Make sure to click the links to go to the full posts!
From A Cup of Jo...
Her illustrated guide to all things Table Manners and Etiquette at the Dinner Table
Some really helpful hints and tips. I never knew the "cat in your lap, mouse behind you" tip!
|
| Image via A Cup of Joe |
And along similar lines... Wine Etiquette, also from A Cup of Jo.
Joy the Baker always posts the most lovely, delicious things. Honestly, I am drooling over her Lunch Waffles with Apples and Prosciutto
|
| Image via Joy the Baker |
(By the way, are you listening to the Joy the Baker Podcasts? If not, you are seriously missing out. They are such fun! I love listening while I chop veggies for dinner or bust out a half-hour workout on the elliptical.)
Clever and Cute Sunday Brunch idea....
|
| Image via ValSoCal
What blogs do you follow and what is inspiring you these days?!
|
Monday, April 16, 2012
Three-Ingredient Strawberry Jam
I think I need to confess something.

I am a jam-snob.
Let me explain how this came to be, join me as I recount how it all happened (Hint: it involves homemade strawberry jam...and yes, there is a recipe at the end of the story).
So, I was standing in the jam aisle at the grocery store, completely mesmerized by the dazzling assortment: dozens of different flavors, some labeled sugar-free, some with added fiber, some with no added sugar (different than the sugar-free!). There were organic varieties and some packaged in squeeze bottles, varieties containing whole fruit pieces and some seedless, all in a bright array of rainbow colors.
(BTW what is the difference between jam, jelly, preserves, compote, marmalade and fruit butter?!?)
For as different as the varied jams and jellies seemed at first glance, they all had a few things in common - starting with the ingredient list. They all looked a little like this:
Wow - that's a lot of sugar (HFCS, Corn Syrup and Sugar are ALL sources of added dietary sugars).
So, then I looked at the Sugar-Free and No-Added Sugar varieties. Their ingredient lists were longer and full of things I couldn't pronounce, and the first ingredient was water (WTF?!):


Oh, and another tip. If you do happen to come home from the U-Pick Farm with 12 Pounds of Strawberries, you can freeze a big giant bag of them and make this jam at a later date. Like in January when strawberries cost $5 per pint and have to be shipped all the way from Mexico. You will be so happy you picked 12 pounds and froze half of them. You'll probably want to thank me - FYI, I happily accept homemade jam as a Thank You gift :-)


I am a jam-snob.
Let me explain how this came to be, join me as I recount how it all happened (Hint: it involves homemade strawberry jam...and yes, there is a recipe at the end of the story).
So, I was standing in the jam aisle at the grocery store, completely mesmerized by the dazzling assortment: dozens of different flavors, some labeled sugar-free, some with added fiber, some with no added sugar (different than the sugar-free!). There were organic varieties and some packaged in squeeze bottles, varieties containing whole fruit pieces and some seedless, all in a bright array of rainbow colors.
(BTW what is the difference between jam, jelly, preserves, compote, marmalade and fruit butter?!?)
For as different as the varied jams and jellies seemed at first glance, they all had a few things in common - starting with the ingredient list. They all looked a little like this:
[Fruit], High Fructose Corn Syrup, Corn Syrup, Sugar, Fruit Pectin, Citric Acid
Wow - that's a lot of sugar (HFCS, Corn Syrup and Sugar are ALL sources of added dietary sugars).
So, then I looked at the Sugar-Free and No-Added Sugar varieties. Their ingredient lists were longer and full of things I couldn't pronounce, and the first ingredient was water (WTF?!):
Water (!!!), [Fruit], Polydextrose, Maltodextrin, Fruit Pectin, Locust Bean Gum, Natural Flavor (?), Citric Acid, Potassium Sorbate, Sucralose (Splenda), Calcium Chloride, Red 40
Even the varieties billing themselves as all-natural and simple 100% fruit contained some surprising ingredients:
Fruit Syrup, [Fruit], Lemon Juice Concentrate, Fruit Pectin, Red Grape Juice Concentrate added for color, Natural Flavors
It seemed to me like something so simple, so pure and lovely like preserved fruit ought to really be easy to make. Right?!
Well actually, YES! And let me assure you - SO. WORTH. MAKING. The ability to control the ingredients and the amount of sugar makes it worth it to me, the fresh and delicious taste is the icing on the cake.
Especially if you can pick your own ripe berries for $.50/quart (yes, that's what it cost us when we went picking about a month ago). Granted, it requires a large amount of berries to yield a modest amount of preserves, so it doesn't really make a whole lot of sense to make this when you have to spend $5 per pint for imported berries from South America. BUT, it just so happens to be strawberry season on the East Coast now so go find a local U-Pick Farm (scroll down to search by state) and get picking! Make sure to pick more berries than you think you are going to need because if you're anything like us you won't be able to stop eating them fresh, right out of your fridge.

But do save a couple of pints for this jam. It will fill up one pint-sized mason jar plus you will have some overflow. Or use two smaller (re-cycled) clean glass jam jars. You could even just use a clean plastic container. It makes a really nice hostess gift or even perhaps a Mother's Day gift?! My mother loved it....
Feel free to use official canning practices and store the jam in the cupboard for enjoying later. Or it could probably be frozen too. It will last at least 2 weeks in the refrigerator, that is, if you don't eat it all first.

I have made this jam three times already this year, it's that good. I'll never buy grocery-store jam again. There, I said it. Never again. Jam Snob.
It is amazing on top of waffles with plain greek yogurt, sliced fresh strawberries and Artisana Cashew Butter.

Or on toast with it's BF, peanut butter.

Or layered in a jar with greek yogurt, fresh fruit and granola for a quick breakfast on the go.

Or stirred into a bowl of oatmeal with peanut butter for PB&J Oats (a personal fave).
The best part about this jam is, you control the amount of sugar you add. Add as little or as much as you wish, depending on your taste. I didn't need much because I was using really sweet berries, but you can adjust the sugar as you wish.
Three-Ingredient Strawberry Jam
adapted from Apples for Jam
makes about 2 1/2 cups of jam
2 pints fresh ripe strawberries, washed, hulled and quartered (this is about 5 cups of chopped berries)
1/4 cup + 2 Tablespoons sugar (or more or less, depending on your taste preference and how sweet your berries are)
juice from 1/2 lemon (I used a very juicy lemon. If yours is kinda dry, use the juice from the whole lemon)
optional 4th ingredient: 1/2 teaspoon vanilla extract
Toss the chopped strawberries with the lemon juice and the sugar in a large non-reactive bowl (not aluminum). I would recommend you start with 1/4 cup of sugar, you can always add more later if necessary. Let the berries, juice and sugar sit 1-2 hours, or as long as overnight in the refrigerator, covered, stirring a couple of times to let the berries release their juices.
After resting, pour about 2/3 of the berries and all of the liquid into a large saucepan over medium-high heat and bring to a boil. Lower the heat and simmer 15-20 minutes until thickened.
Using a potato masher or wooden spoon, mash the cooked berries very well until there are no large chunks. (As an alternative, you could use an immersion blender to puree until smooth). Then, add the reserved berries (and any more accumulated juice) to the pot and bring to a boil. Lower the heat to a simmer and cook an additional 10-15 minutes until the jam is thickened, tasting after about 5 minutes and adding additional sugar, 1 tablespoon at a time, until desired sweetness. Stir in the vanilla extract, if using. Cook until thick. You will know the jam is thickened enough when you drip a small spoonful onto a plate, tilt the plate down and the jam does not run off but clings and slides down slowly.
Pour the jam into clean glass jars and store in the refrigerator. It keeps at least 2 weeks in the refrigerator. Conversely, you could follow proper canning procedures and store in the cupboard until ready to use.
Here are a couple resources for small-batch home-canning. (Full-disclosure - I have never used these guides.)

Three-Ingredient Strawberry Jam
I think I need to confess something.
I am a jam-snob.
Let me explain how this came to be, join me as I recount how it all happened (Hint: it involves homemade strawberry jam...and yes, there is a recipe at the end of the story).
So, I was standing in the jam aisle at the grocery store, completely mesmerized by the dazzling assortment: dozens of different flavors, some labeled sugar-free, some with added fiber, some with no added sugar (different than the sugar-free!). There were organic varieties and some packaged in squeeze bottles, varieties containing whole fruit pieces and some seedless, all in a bright array of rainbow colors.
(BTW what is the difference between jam, jelly, preserves, compote, marmalade and fruit butter?!?)
For as different as the varied jams and jellies seemed at first glance, they all had a few things in common - starting with the ingredient list. They all looked a little like this:
Wow - that's a lot of sugar (HFCS, Corn Syrup and Sugar are ALL sources of added dietary sugars).
So, then I looked at the Sugar-Free and No-Added Sugar varieties. Their ingredient lists were longer and full of things I couldn't pronounce, and the first ingredient was water (WTF?!):
Oh, and another tip. If you do happen to come home from the U-Pick Farm with 12 Pounds of Strawberries, you can freeze a big giant bag of them and make this jam at a later date. Like in January when strawberries cost $5 per pint and have to be shipped all the way from Mexico. You will be so happy you picked 12 pounds and froze half of them. You'll probably want to thank me - FYI, I happily accept homemade jam as a Thank You gift :-)
I am a jam-snob.
Let me explain how this came to be, join me as I recount how it all happened (Hint: it involves homemade strawberry jam...and yes, there is a recipe at the end of the story).
So, I was standing in the jam aisle at the grocery store, completely mesmerized by the dazzling assortment: dozens of different flavors, some labeled sugar-free, some with added fiber, some with no added sugar (different than the sugar-free!). There were organic varieties and some packaged in squeeze bottles, varieties containing whole fruit pieces and some seedless, all in a bright array of rainbow colors.
(BTW what is the difference between jam, jelly, preserves, compote, marmalade and fruit butter?!?)
For as different as the varied jams and jellies seemed at first glance, they all had a few things in common - starting with the ingredient list. They all looked a little like this:
[Fruit], High Fructose Corn Syrup, Corn Syrup, Sugar, Fruit Pectin, Citric Acid
Wow - that's a lot of sugar (HFCS, Corn Syrup and Sugar are ALL sources of added dietary sugars).
So, then I looked at the Sugar-Free and No-Added Sugar varieties. Their ingredient lists were longer and full of things I couldn't pronounce, and the first ingredient was water (WTF?!):
Water (!!!), [Fruit], Polydextrose, Maltodextrin, Fruit Pectin, Locust Bean Gum, Natural Flavor (?), Citric Acid, Potassium Sorbate, Sucralose (Splenda), Calcium Chloride, Red 40
Even the varieties billing themselves as all-natural and simple 100% fruit contained some surprising ingredients:
Fruit Syrup, [Fruit], Lemon Juice Concentrate, Fruit Pectin, Red Grape Juice Concentrate added for color, Natural Flavors
It seemed to me like something so simple, so pure and lovely like preserved fruit ought to really be easy to make. Right?!
Well actually, YES! And let me assure you - SO. WORTH. MAKING. The ability to control the ingredients and the amount of sugar makes it worth it to me, the fresh and delicious taste is the icing on the cake.
Especially if you can pick your own ripe berries for $.50/quart (yes, that's what it cost us when we went picking about a month ago). Granted, it requires a large amount of berries to yield a modest amount of preserves, so it doesn't really make a whole lot of sense to make this when you have to spend $5 per pint for imported berries from South America. BUT, it just so happens to be strawberry season on the East Coast now so go find a local U-Pick Farm (scroll down to search by state) and get picking! Make sure to pick more berries than you think you are going to need because if you're anything like us you won't be able to stop eating them fresh, right out of your fridge.
But do save a couple of pints for this jam. It will fill up one pint-sized mason jar plus you will have some overflow. Or use two smaller (re-cycled) clean glass jam jars. You could even just use a clean plastic container. It makes a really nice hostess gift or even perhaps a Mother's Day gift?! My mother loved it....
Feel free to use official canning practices and store the jam in the cupboard for enjoying later. Or it could probably be frozen too. It will last at least 2 weeks in the refrigerator, that is, if you don't eat it all first.
I have made this jam three times already this year, it's that good. I'll never buy grocery-store jam again. There, I said it. Never again. Jam Snob.
It is amazing on top of waffles with plain greek yogurt, sliced fresh strawberries and Artisana Cashew Butter.
Or on toast with it's BF, peanut butter.
Or layered in a jar with greek yogurt, fresh fruit and granola for a quick breakfast on the go.
Or stirred into a bowl of oatmeal with peanut butter for PB&J Oats (a personal fave).
The best part about this jam is, you control the amount of sugar you add. Add as little or as much as you wish, depending on your taste. I didn't need much because I was using really sweet berries, but you can adjust the sugar as you wish.
Three-Ingredient Strawberry Jam
adapted from Apples for Jam
makes about 2 1/2 cups of jam
2 pints fresh ripe strawberries, washed, hulled and quartered (this is about 5 cups of chopped berries)
1/4 cup + 2 Tablespoons sugar (or more or less, depending on your taste preference and how sweet your berries are)
juice from 1/2 lemon (I used a very juicy lemon. If yours is kinda dry, use the juice from the whole lemon)
optional 4th ingredient: 1/2 teaspoon vanilla extract
Toss the chopped strawberries with the lemon juice and the sugar in a large non-reactive bowl (not aluminum). I would recommend you start with 1/4 cup of sugar, you can always add more later if necessary. Let the berries, juice and sugar sit 1-2 hours, or as long as overnight in the refrigerator, covered, stirring a couple of times to let the berries release their juices.
After resting, pour about 2/3 of the berries and all of the liquid into a large saucepan over medium-high heat and bring to a boil. Lower the heat and simmer 15-20 minutes until thickened.
Using a potato masher or wooden spoon, mash the cooked berries very well until there are no large chunks. (As an alternative, you could use an immersion blender to puree until smooth). Then, add the reserved berries (and any more accumulated juice) to the pot and bring to a boil. Lower the heat to a simmer and cook an additional 10-15 minutes until the jam is thickened, tasting after about 5 minutes and adding additional sugar, 1 tablespoon at a time, until desired sweetness. Stir in the vanilla extract, if using. Cook until thick. You will know the jam is thickened enough when you drip a small spoonful onto a plate, tilt the plate down and the jam does not run off but clings and slides down slowly.
Pour the jam into clean glass jars and store in the refrigerator. It keeps at least 2 weeks in the refrigerator. Conversely, you could follow proper canning procedures and store in the cupboard until ready to use.
Here are a couple resources for small-batch home-canning. (Full-disclosure - I have never used these guides.)
Subscribe to:
Posts (Atom)